
This educational activity is designed to show the new user how to use the CLI Wallet. It is based off of v0.3 but will be very similar to future versions.
Open a terminal and navigate to the folder where you extracted the download of the CLI wallet into, in this case it’s
cd /home/fire/masari-linux-x64-v0.3.0.0
and start the daemon with ./masarid.

After the daemon is synced, open a new terminal tab with Ctrl + Shift + t. Start the CLI wallet with:
./masari-wallet-cli
Create a new wallet by entering any name for the wallet. Then input a password and choose your language. Make sure to copy down and keep your 25 word seed safe- with just those 25 words you can access and restore the entire wallet, including spending all the funds on it. Now you’re ready to begin.
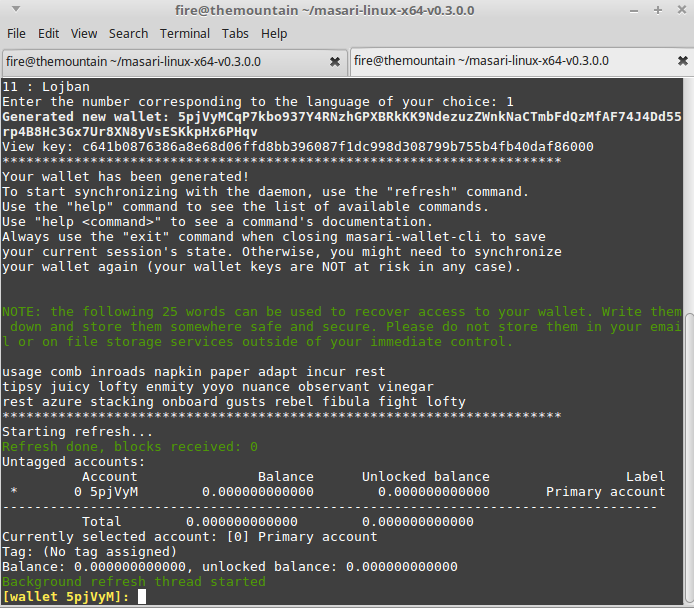
The general structure of a wallet is:
meaning that a wallet can contain many accounts and each account can contain many addresses. The wallet starts out with one account with one address on it. Let’s make more.
First, a new account within our wallet:
account new garage sale income
This will make a new account with the label “garage sale income”. Notice that white spaces are allowed in the new account name. Let’s add another account for “everyday cash”:
account new everyday cash
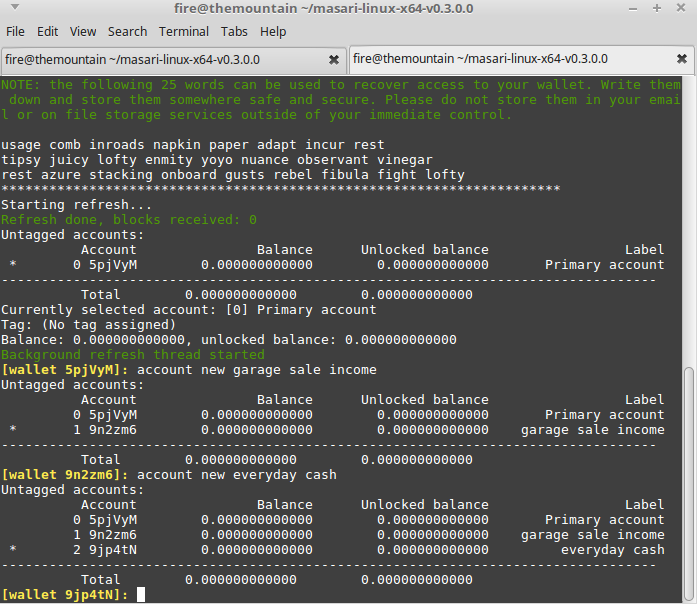
As you can see, we now have 3 accounts indexed 0,1, and 2. To switch between accounts, use:
account switch <index>
Let’s say someone wants to buy the TV at our garage sale. We should switch to account 1- garage sale income, and create a new address to receive the funds. Let’s add the label “old TV”, so we can remember the source of the income when tax season inevitably rolls around.
account switch 1
address new old TV
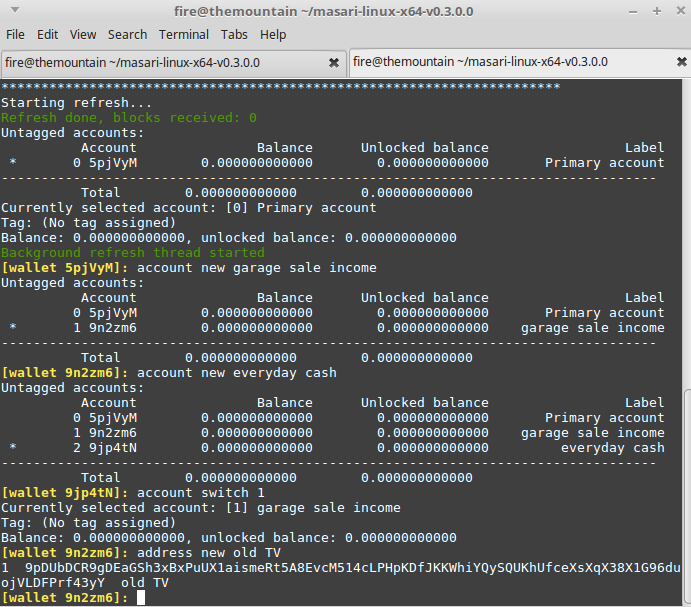
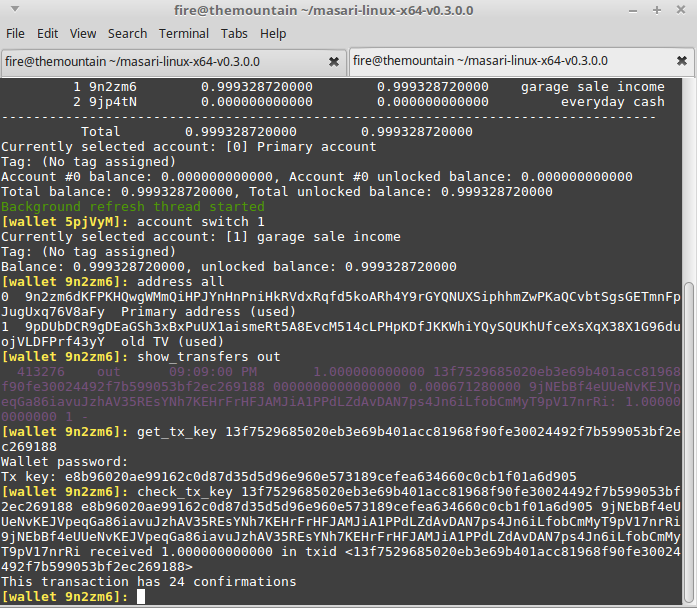
Now we can give this new address 9pDUb…43yY to the customer. The price for the old TV is 2 MSR. When we want to verify that the customer has paid, we can switch to the relevant account and use:
address all
to show all addresses within that account and whether or not they have been used. To check balance, simply type:
balance
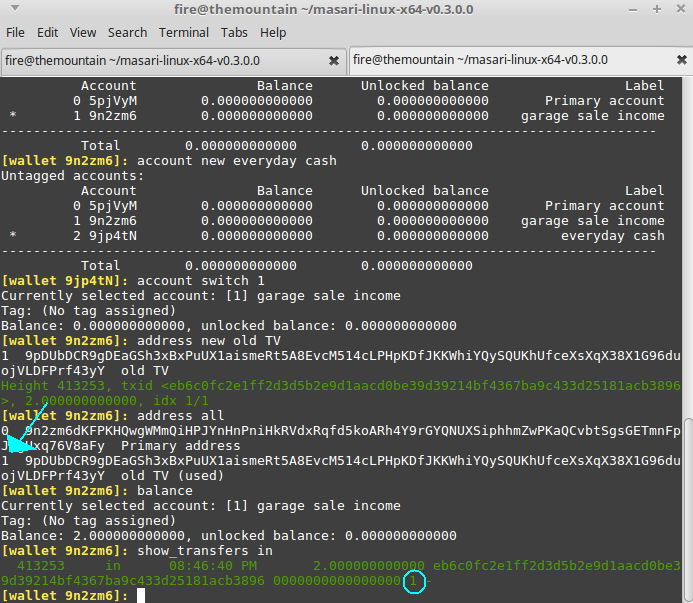
To see specifically which address received the funds, we can use:
show_transfers in
where we see (in order) block height, transaction in or out, time, amount, txid, payment id, and index. The index 1
corresponds to our generated address “old TV” at index 1, so we know the TV is paid for. When the transaction comes in (or is
checked with show_transfers in) it specifies exactly where in the wallet the funds were sent to, in this case (in green) it says “idx 1/1” which means that the funds arrived to the account at index 1 (garage sale income), address at index 1 (old TV). For the sake of privacy, we won’t reuse this address.
If you have previously generated a wallet (from an offline wallet generator for example) and want to import it using the command line interface (CLI), you can use the following tools in a new terminal window:
./masari-wallet-cli --generate-from-view-key <wallet name>
./masari-wallet-cli --generate-from-spend-key <wallet name>
./masari-wallet-cli --restore-deterministic-wallet
Importing with the view key will generate a view-only wallet, which we can not spend from. A view-only wallet also does not show transactions out, but only transactions in. For that reason, the balance reflected in a view-only wallet may be inaccurate, since any transactions out have not been substracted from the balance.
Importing a wallet via spend key or mnemonic phrase will give us full access to the wallet, including the ability to spend the funds on that wallet. This is why spend key and mnemonic phrase must be kept secure at all times!
Now say we want to send 1 MSR to a friend. After we open the wallet and select the account we want to send from, we can use the transfer command. The most general transfer command is:
transfer <address> <amount>
Sending 1 MSR to the address our friend gave us would then look like this:
transfer 9jNEbBf4eUUeNvKEJVpeqGa86iavuJzhAV35REsYNh7KEHrFrHFJAMJiA1PPdLZdAvDAN7ps4Jn6iLfobCmMyT9pV17nrRi 1
If you use a payment ID, it should be inserted after the amount. Using a new address for each transaction is recommended, though. If you want to reuse addresses and send multiple transactions to the same address, you can use the address book function.
To add an entry (white spaces are allowed in description):
address_book add <address> <description>
To show all entries in your address book, use:
address_book
And to delete an entry, use:
address_book delete <index>
All of these commands will show your address book after executing.
You will need 3 things to prove that you sent funds: txid, tx key, and the wallet address you sent to. In this case we sent to the address 9jNEbBf4eUUeNvKEJVpeqGa86iavuJzhAV35REsYNh7KEHrFrHFJAMJiA1PPdLZdAvDAN7ps4Jn6iLfobCmMyT9pV17nrRi which can be verified when we get the txid and show the transfers out. We do that with:
show_transfers out
The txid is the string after the date and amount sent. In this case it’s
13f7529685020eb3e69b401acc81968f90fe30024492f7b599053bf2ec269188
Save this for step 3. Notice that the destination address displayed here.
Next, get the tx key with:
get_tx_key <txid>
In this case it’s
e8b96020ae99162c0d87d35d5d96e960e573189cefea634660c0cb1f01a6d905
Save this for step 3.
Finally, step 3. Check the tx key with the tx ID, tx key, and the address you sent to:
check_tx_key <txid> <txkey> <address>
Possible outcomes are:
<address> received <amount> in txid <txid>
or
Error: <address> received nothing in txid <txid>
The block explorer at https://explorer.getmasari.org can be used to decode outputs (check if you have money coming in to an
address) and prove sending (prove that you sent money out to an address). You’ll need to get some info from your CLI
wallet first, though. To decode outputs, you’ll need the address where you’re expecting funds (which you can get to by
doing address in the corresponding account) and the private viewkey. Doing
viewkey
will return your private viewkey and your public viewkey. Each wallet has 1 set of viewkeys, so it’s the same for all your accounts and addresses within the same wallet.
Proving sending is a bit more tricky. You also need 2 pieces of info here- the recipient’s address, and the tx private key that was generated by your wallet when you sent that transaction. Use the method outlined above in “Proving sending” to get the information needed, then simply copy and paste the info into the block explorer.
Since cryptocurrencies are founded on cryptography, we can do some pretty neat things with the CLI wallet, like sign and verify files. Let’s make a text file with a message, say message.txt, and sign it with:
sign <file_to_sign>
for example:
sign /home/me/Desktop/message.txt
This will print out a signature. You need to give that signature and your wallet address (along with the file in question, of course) to the other party to verify the file with the verify command:
verify <filename> <address> <signature>
They can verify that the file has not been tampered with by doing:
verify /home/my_friend/Downloads/message.txt <my address> <signature from previous step>
The two possible outcomes are:
Good signature from <address>
or
Error: Bad signature from <address>
Warning: It’s best to start this process with a new wallet. Making a wallet that’s in use into a multisig wallet will cause all the wallet’s existing funds to be subject to the multisig wallet requirements.
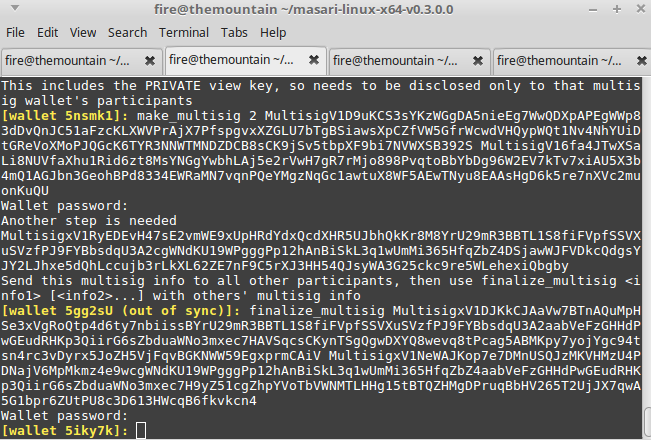
Let’s make a 2/3 multisig wallet- meaning a wallet that is shared between 3 parties and requires the signature of 2 of the parties in order to send a transaction. After generating a new wallet (or 3 in the case of this tutorial example) we start by doing:
prepare_multisig
The output will be:
[wallet 5nsmk1]: prepare_multisig
Wallet password:
MultisigV1cwjWztsW58NCXeWLBJm9oBawvQGGSTrcvhEo9diSuZQ8FSiGVPqLT3DbHeYKBTkyGjfbWqzpViuXwDPFvsL5RVdUbw1E5W9Tuc9XmWSS8dTySm2HPfaoyjBNi88AzP8DJQP5VV4CaVhxzAJgiGNpyC8ChJgXL4mPFWqyLb8FdUxeY2WC
Send this multisig info to all other participants, then use make_multisig <threshold> <info1> [<info2>...] with others' multisig info
This includes the PRIVATE view key, so needs to be disclosed only to that multisig wallet's participants
All parties involved need to run this command and share their respective output line (MultisigV1cs…Y2WC in our case) with all other parties, so make sure to save that output line somewhere for easy access.
Let’s say that our 2 friends gave us their multisig info as follows:
MultisigV1D9uKCS3sYKzWGgDA5nieEg7WwQDXpAPEgWWp83dDvQnJC51aFzcKLXWVPrAjX7PfspgvxXZGLU7bTgBSiawsXpCZfVW5GfrWcwdVHQypWQt1Nv4NhYUiDtGReVoXMoPJQGcK6TYR3NNWTMNDZDCB8sCK9jSv5tbpXF9bi7NVWXSB392S
MultisigV16fa4JTwXSaLi8NUVfaXhu1Rid6zt8MsYNGgYwbhLAj5e2rVwH7gR7rMjo898PvqtoBbYbDg96W2EV7kTv7xiAU5X3b4mQ1AGJbn3GeohBPd8334EWRaMN7vqnPQeYMgzNqGc1awtuX8WF5AEwTNyu8EAAsHgD6k5re7nXVc2muonKuQU
Now we do make_multisig <# of signatures needed to send funds> <friends’ multisig info>
make_multisig 2 MultisigV1D9uKCS3sYKzWGgDA5nieEg7WwQDXpAPEgWWp83dDvQnJC51aFzcKLXWVPrAjX7PfspgvxXZGLU7bTgBSiawsXpCZfVW5GfrWcwdVHQypWQt1Nv4NhYUiDtGReVoXMoPJQGcK6TYR3NNWTMNDZDCB8sCK9jSv5tbpXF9bi7NVWXSB392S MultisigV16fa4JTwXSaLi8NUVfaXhu1Rid6zt8MsYNGgYwbhLAj5e2rVwH7gR7rMjo898PvqtoBbYbDg96W2EV7kTv7xiAU5X3b4mQ1AGJbn3GeohBPd8334EWRaMN7vqnPQeYMgzNqGc1awtuX8WF5AEwTNyu8EAAsHgD6k5re7nXVc2muonKuQU
Note that there’s a space between the 2 strings of multisig info from our friends, and we do not include our own multisig info in this command. The output will be something like:
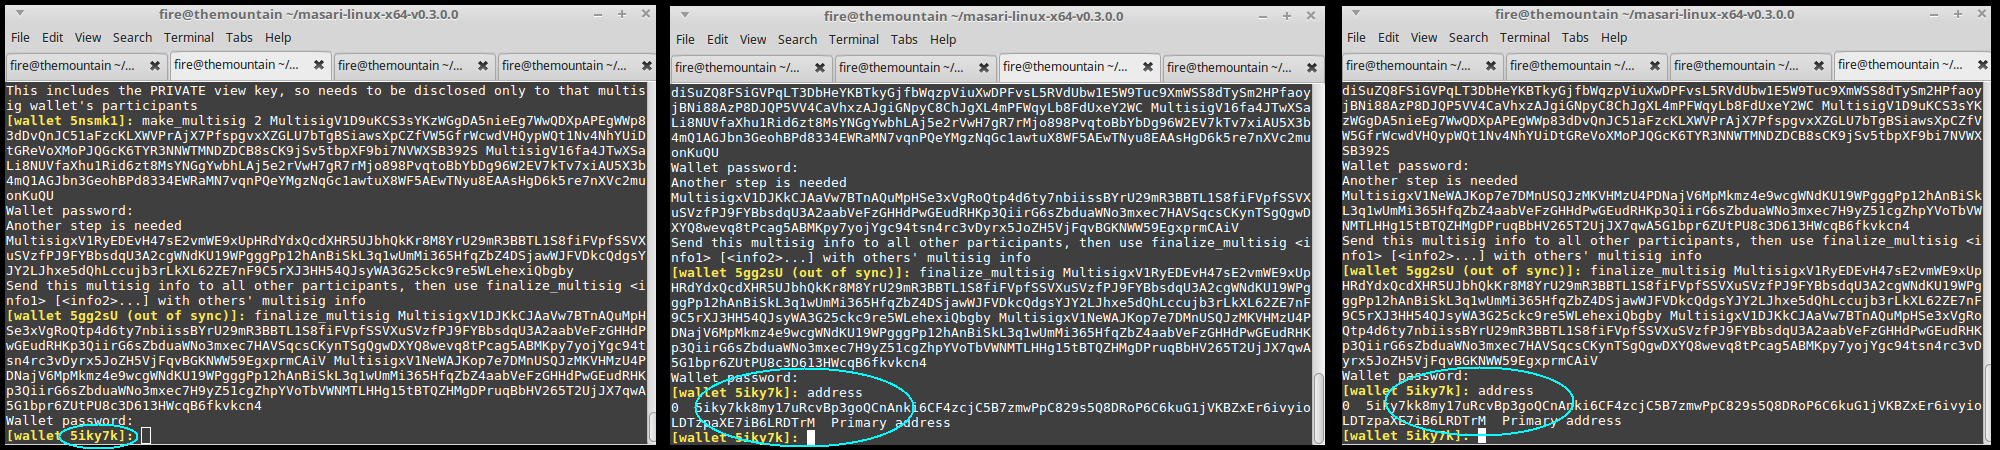
Another step is needed
MultisigxV1RyEDEvH47sE2vmWE9xUpHRdYdxQcdXHR5UJbhQkKr8M8YrU29mR3BBTL1S8fiFVpfSSVXuSVzfPJ9FYBbsdqU3A2cgWNdKU19WPgggPp12hAnBiSkL3q1wUmMi365HfqZbZ4DSjawWJFVDkcQdgsYJY2LJhxe5dQhLccujb3rLkXL62ZE7nF9C5rXJ3HH54QJsyWA3G25ckc9re5WLehexiQbgby
Send this multisig info to all other participants, then use finalize_multisig <info1> [<info2>...] with others' multisig info
This is telling us to do almost the exact same thing one more time. Each person does finalize_multisig with the output line
of the other 2 friends. Our output line was [MultisigxV1RyED…LehexiQbgby] and our friends gave us the output lines
[MultisigxV1DJKkCJA…EgxprmCAiV] and [MultisigxV1NeWAJK…fkvkcn4], so for this example:
finalize_multisig MultisigxV1DJKkCJAaVw7BTnAQuMpHSe3xVgRoQtp4d6ty7nbiissBYrU29mR3BBTL1S8fiFVpfSSVXuSVzfPJ9FYBbsdqU3A2aabVeFzGHHdPwGEudRHKp3QiirG6sZbduaWNo3mxec7HAVSqcsCKynTSgQgwDXYQ8wevq8tPcag5ABMKpy7yojYgc94tsn4rc3vDyrx5JoZH5VjFqvBGKNWW59EgxprmCAiV MultisigxV1NeWAJKop7e7DMnUSQJzMKVHMzU4PDNajV6MpMkmz4e9wcgWNdKU19WPgggPp12hAnBiSkL3q1wUmMi365HfqZbZ4aabVeFzGHHdPwGEudRHKp3QiirG6sZbduaWNo3mxec7H9yZ51cgZhpYVoTbVWNMTLHHg15tBTQZHMgDPruqBbHV265T2UjJX7qwA5G1bpr6ZUtPU8c3D613HWcqB6fkvkcn4
Remember to put a space between the sets of multisig info. There should be no output, but you will notice that the wallet address has changed.
Your new, multisig wallet address can be found by doing
address
and you will notice that now all 3 parties have the same wallet address:
After our multisig wallet has some funds on it, let’s spend them. First we need to exchange multisig info with our friends. Since this is a 2/3 multisig wallet, we need the info from 1 friend to complete a transaction. Alternatively, we could get the info from both friends and decide later which info to sign with. First we’ll export our multisig info by using the command export_multisig_info and any file name, like:
export_multisig_info multis1
The exported file will be in the same folder as your wallets, in this case /home/fire/masari-linux-x64-v0.3.0.0. We need to send this to our 2 friends so they can sign a transaction, and they need to send their exported multisig info to us.
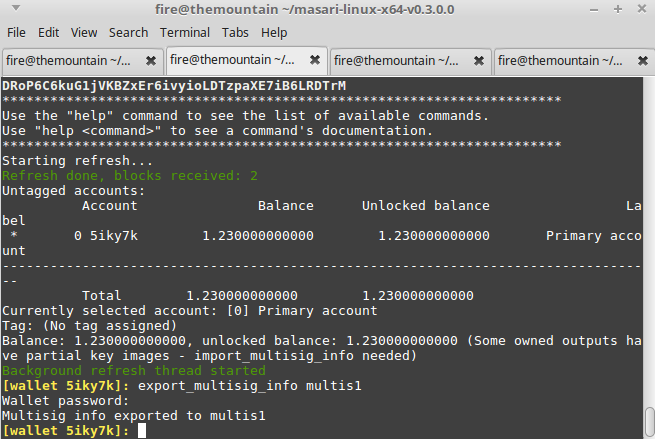
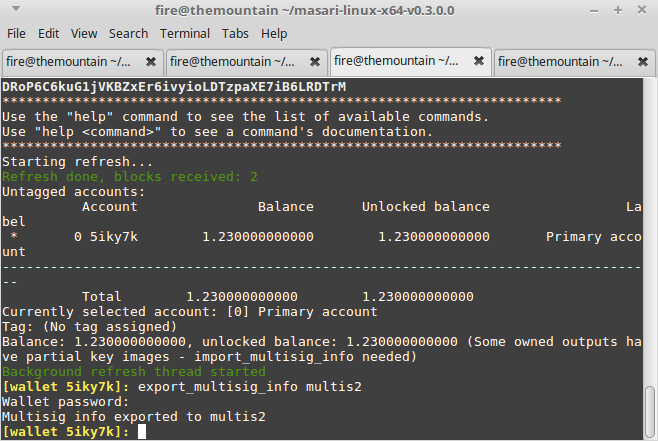

Now we’ll import our friends’ multisig info files. By default, the wallet will look in the shell working folder for the files (that was /home/fire/masari-linux-x64-v0.3.0.0 in this case, but can vary if you have an advanced setup), so make sure the files are there. The file “multis 2” should be in friend #2’s wallet folder since he exported it there, same for “multis 3”. After we have all 3 multisig info files, we use the import_multisig_info command:
import_multisig_info multis2 multis3
The output will tell us the balance our multisig wallet has to work with, and that multisig info was imported. See the photo below for reference.
Now let’s spend!
Any of the 3 friends can start the transaction, and will need to get the signature from 1 of the other 2 friends. Start the transaction as usual
transfer 5qF9rxMbxBH4mEXBs1SE1taMDrkEoVzGX4ycwBhNCiVqPMc5yEKoEqN4TLavJcdLMJGyQgawFTKbu5QTHFLVQWsWTbFTkX6 1
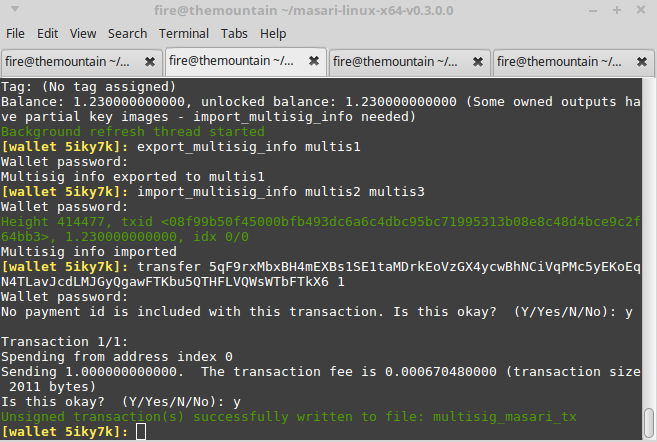
This will generate a file called multisig_masari_tx. For peace of mind, let’s do one transaction at a time. Let’s choose friend #2 to complete the signature for this transaction. If we choose a friend that we did not import the multisig file info from, we will get the error
Error: Failed to sign multisig transaction: Final signed transaction not found: this transaction was likely made without our export data, so we cannot sign it
Also, our friend needs to have our file multisig_masari_tx in his shell working folder (which means we have to send it) and then they can use sign_multisig with the file multisig_masari_tx:
sign_multisig multisig_masari_tx
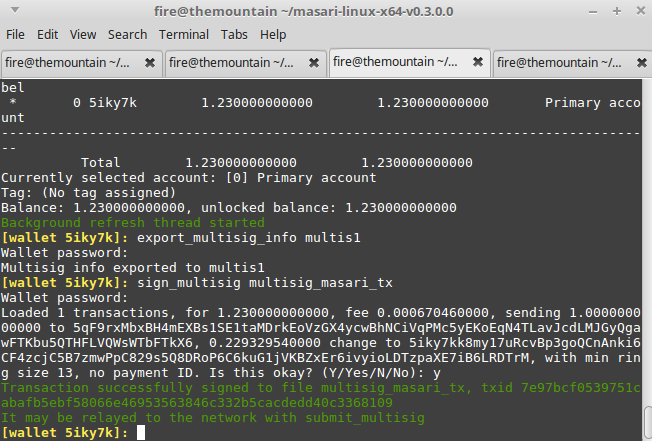
After verifying the address, amount, fees, ring size, and change address, our friend will press y and the transaction will be successfully signed to the file multisig_masari_tx. Now the transaction is ready to be relayed to the network. Our friend can
send the file back to us or broadcast it himself by doing:
submit_multisig multisig_masari_tx
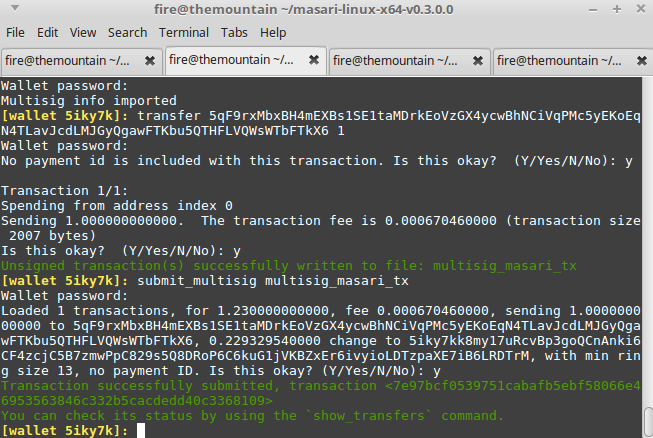
Congratulations, transaction successfully submitted!
To recap, the sending process went like:
export_multisig_info and share their file with the other one (or both).import_multisig_info with at least 1 other multisig info file.transfer command and generate a file called “multisig_masari_tx”, which should be sent to at least 1 other friend for signing.sign_multisig multisig_masari_txon the filesubmit_multisig multisig_masari_txIf the friends want to send another transaction, they should go back to step 1 and start the process again. If you don’t delete the file multisig_masari_tx it will just be overwritten next time a multisig transaction is created.
To send to multiple addresses in the same transaction, use:
transfer <address> <amount> <address> <amount> <address> <amount> <address> <amount>
To send all the money from an address, use
sweep_all <destination address>
Remember that if you want to sweep everything away from the entire wallet you will have to go through each account and do
sweep_all for each address. The sweep_all function starts with the highest index address and goes down to the address
at index 0. To check that you got all the coin out of the wallet, simply do
account
and it will show you each account with it’s corresponding balance.
bc_height prints the block chain height
encrypted_seed gives you the option to encrypt your seed words with a password of your choosing, and then displays it, while
seed simply displays your seed words
donate <amount> is the easy way to make a donation to the development fund
fee shows the current tx fee per kb, as well as any backlogs in the mempool
payment_id is used to generate a random payment ID, useful for knowing who a specific payment came from
wallet_info displays basic info about your wallet, like name and address
This concludes the Masari wallet activity. Enjoy transferring or hodling your Masari using the CLI wallet! If you have any questions, hop on any Masari community and ask for help.
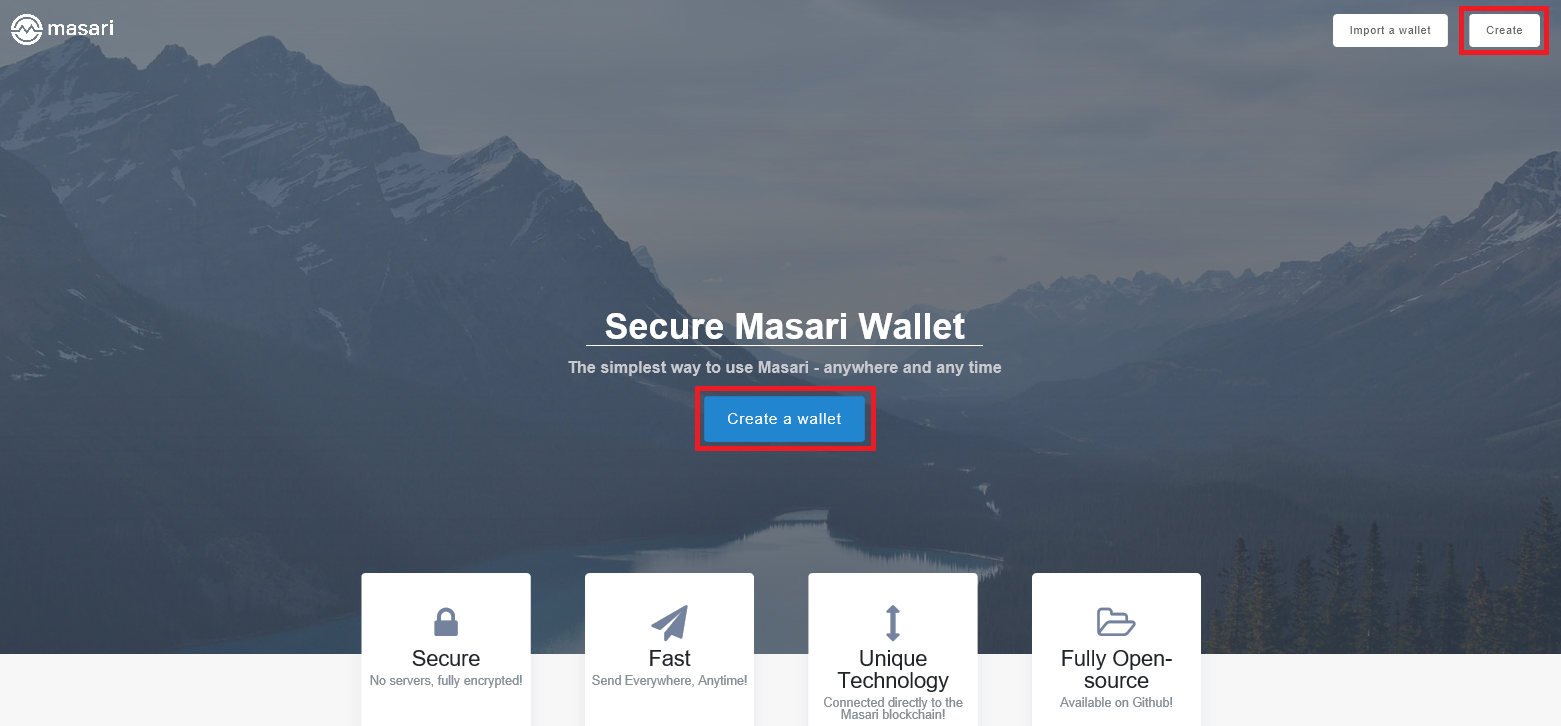
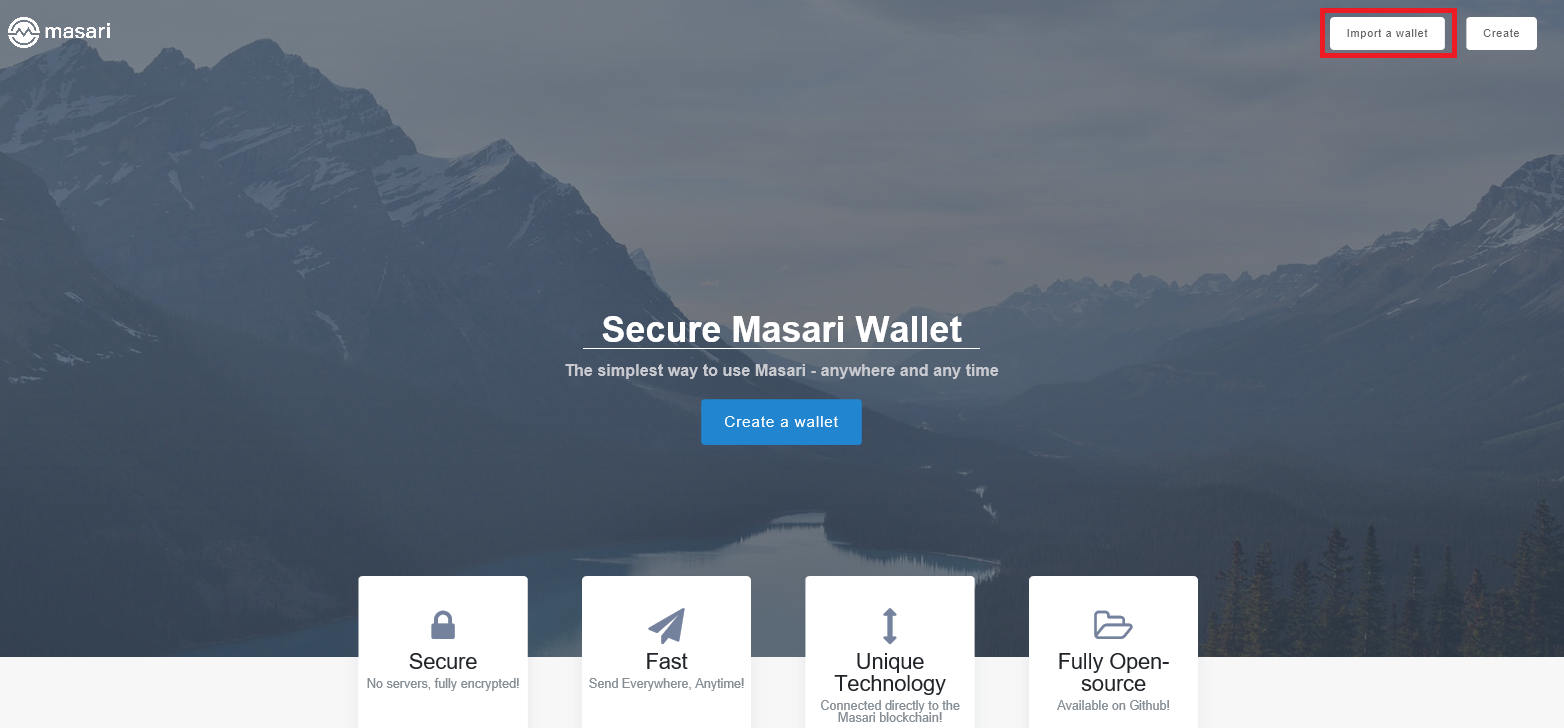
This educational activity is designed to show the new user how to use the Web Wallet, accessible at the following url:
Begin Wallet Creation
Once you have navigated to the website, click ‘Create a wallet’ in the center, or ‘Create’ on the top-right corner.
Choosing a Password
After clicking ‘Create a wallet’ or ‘Create’, your wallet will be automatically generated and prompt you to create a password.
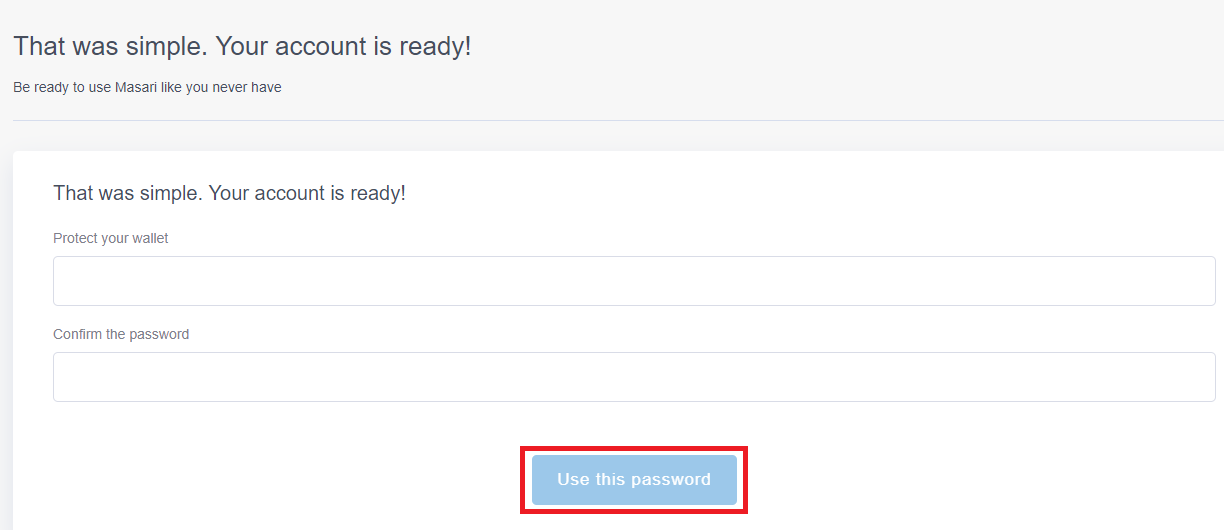
It is advisable to pick a password that is complex, as you could lose your funds if a malevolent person logs into your wallet. When ready, click ‘Use this password’.
Mnemonic Phrase
After choosing a password, you will be prompted to either download a file of or write down your mnemonic phrase.
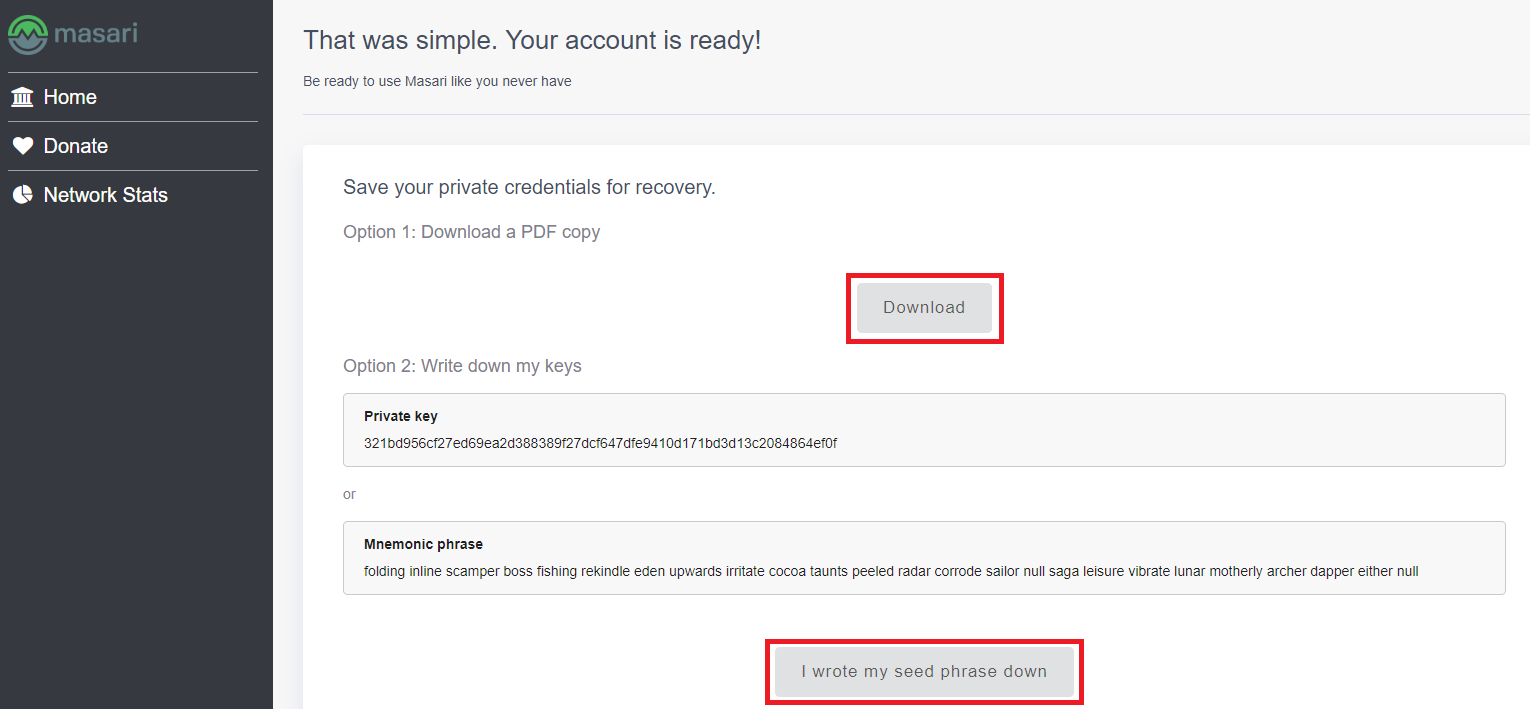
Make sure to keep a copy (or multiple copies) at all times in a secure place, as your wallet cannot be recovered if you lose it. Also, never share this information with anyone except trusted parties. If you understand these risks, click ‘I Understand. Continue.’.

Congratulations! You have sucessfully created a Masari wallet. The wallet will automatically start syncronizing with the network.
Your newly created wallet is now easily accessible by going to the landing page and clicking ‘Load my wallet’ in the center or on the top-right corner.
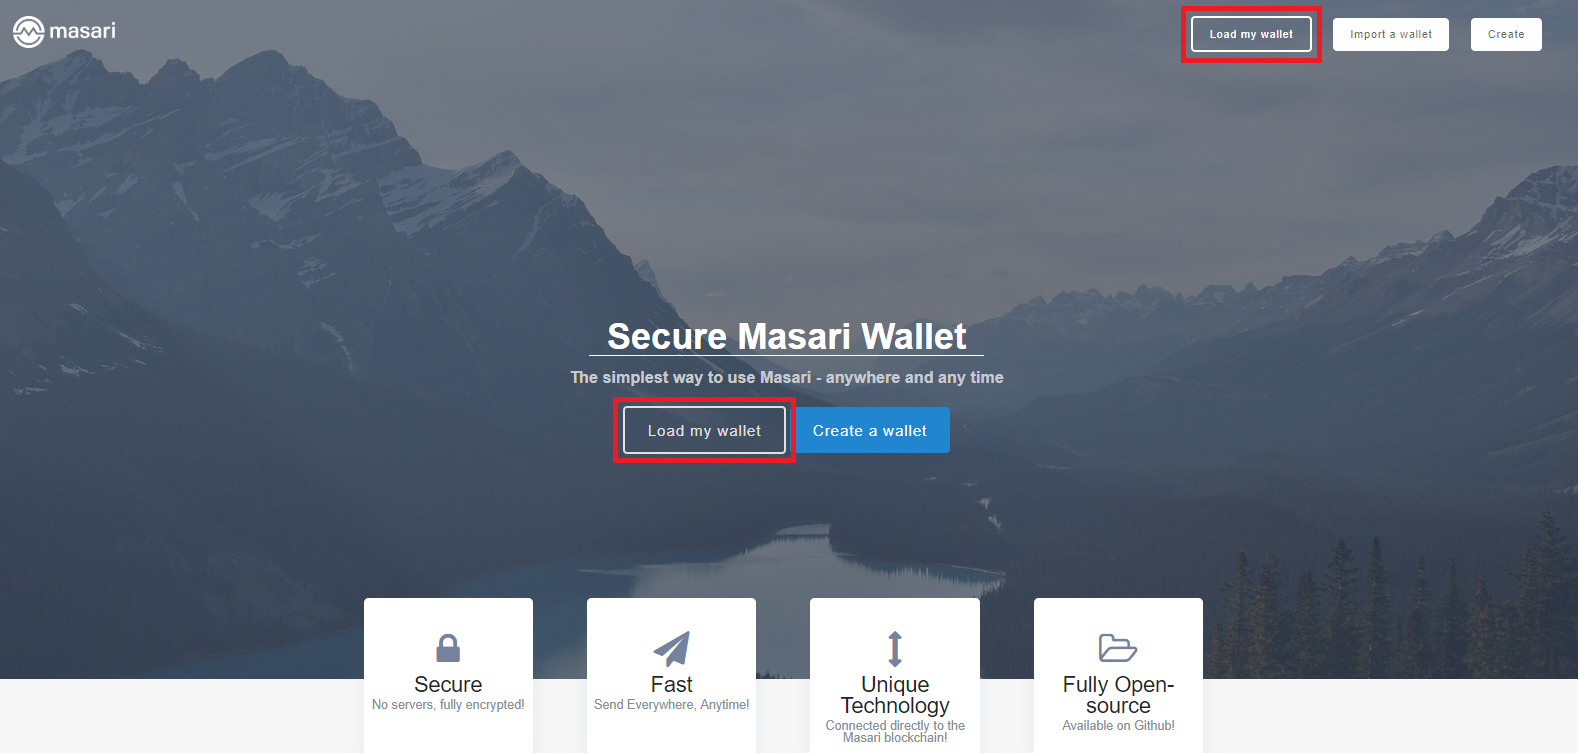
If the cache is deleted in the future, you will have to import the wallet.
Begin Wallet Import
If you have already created a wallet in the past, you have the option to import it. To start, click on ‘Import a wallet’ on the top-right corner.
Import Method
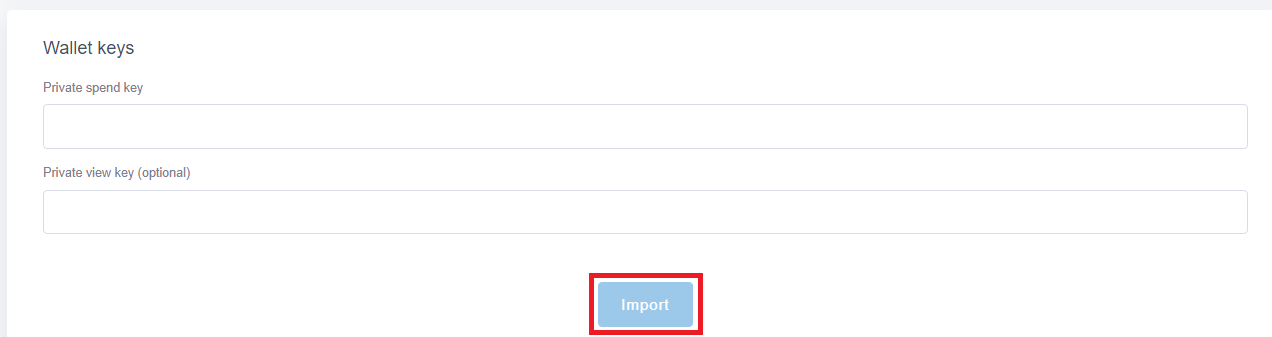
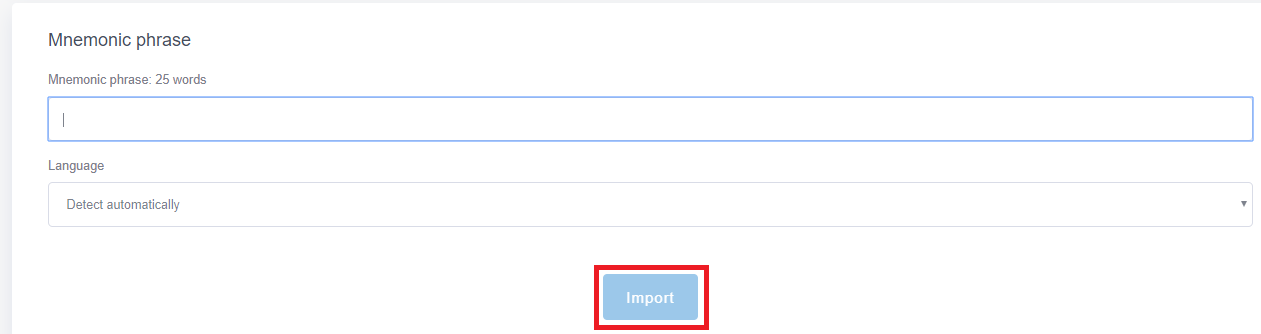
After clicking ‘Import a wallet’, you will be prompted to chose the method of import. Use whichever method you prefer, the most common being ‘From a file’ or ‘From a mnemonic phrase’.

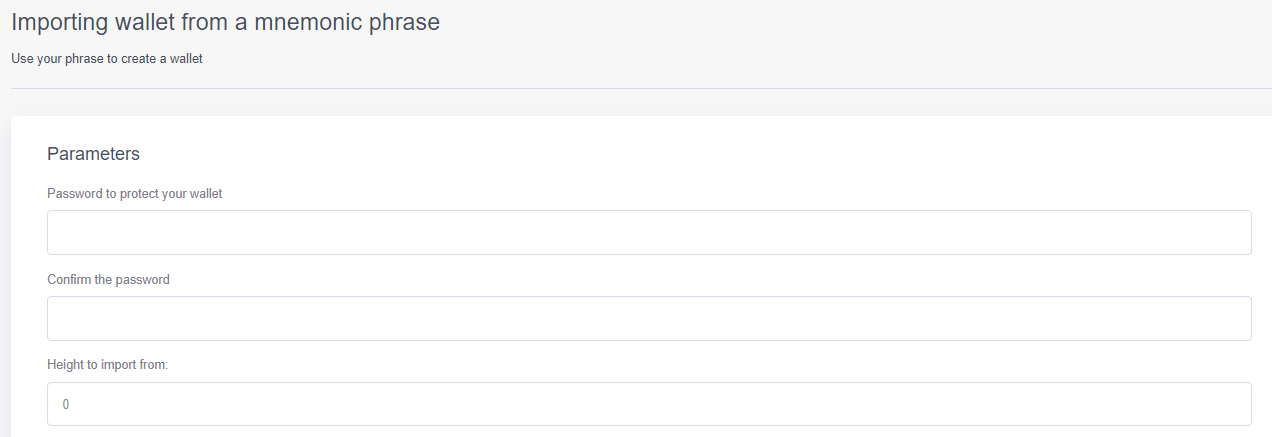
Choosing a Password and Restore Height
After choosing the import method, you will be prompted to select a password and restore height. It is advisable to pick a password that is complex, as you could lose your funds if a malevolent person logs into your wallet. If you dont know the height at which your wallet was first created, choose 0.
Importing
If you chose to import using keys, enter the private keys and click ‘Import’.
If you chose to import using a file, click on ‘Select the file’, navigate to the wallet file on your computer, then click ‘Import’.

If you chose to import using a mnemonic phrase, enter it and click ‘Import’.
The QR code import feature is currently not supported.
Congratulations! You have sucessfully created a Masari wallet. The wallet will automatically start syncronizing with the network.
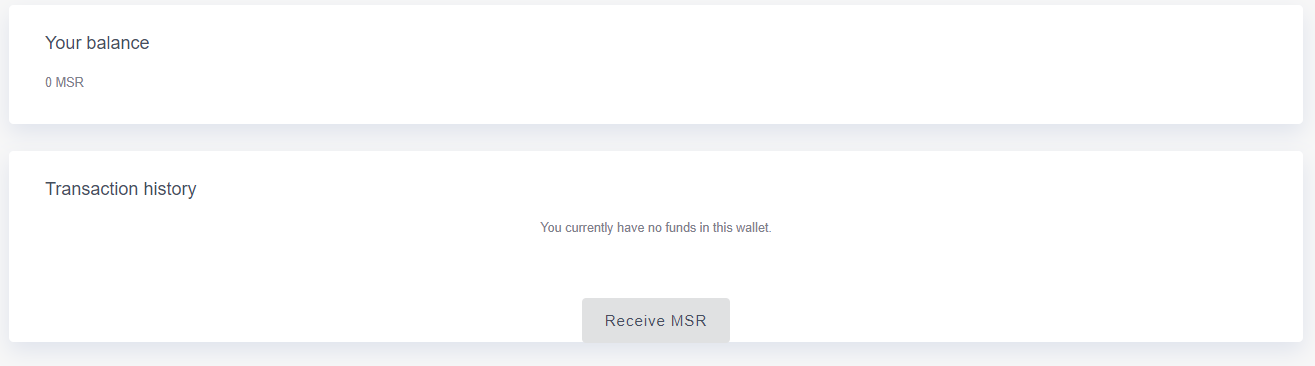
Account
The account page shows your wallet balance (will show sync % if not fully synced yet) and transaction history.
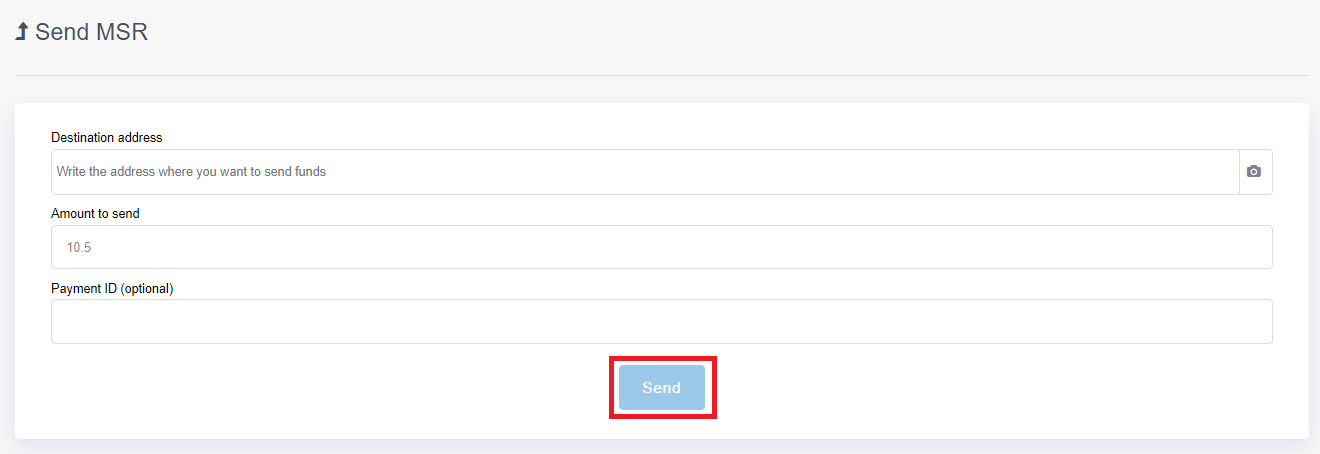
Send
Transfer Masari by going to the send page. All you have to do is enter the address, amount, and payment ID (optional), then click ‘Send’.
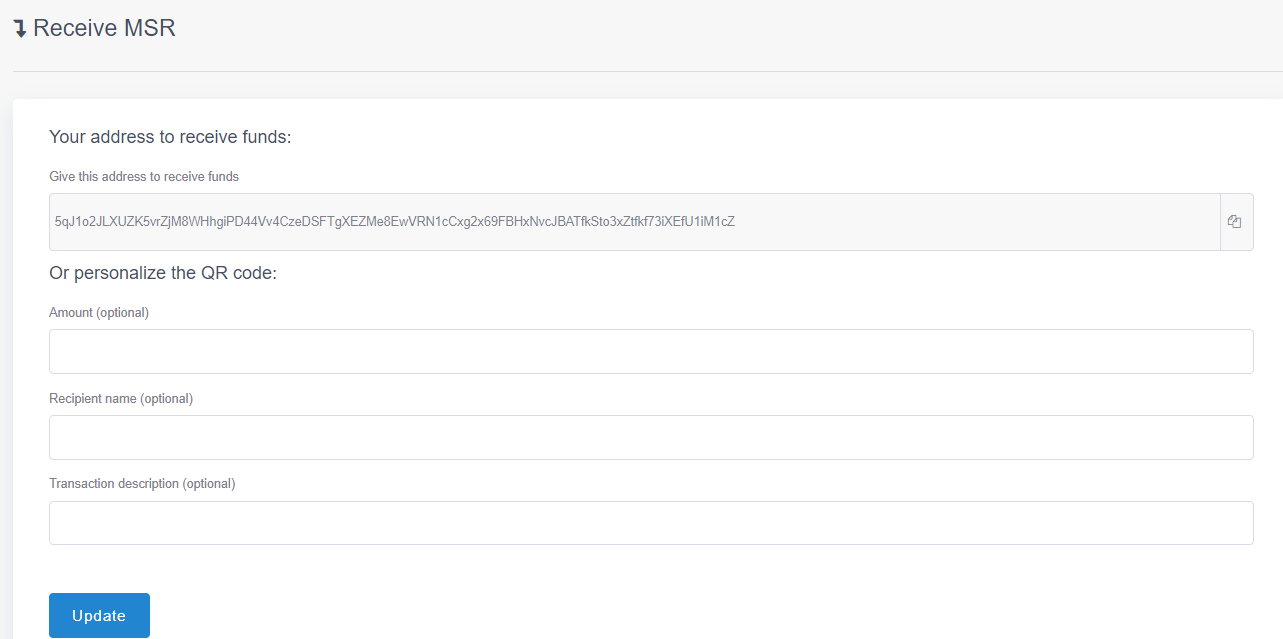
Recieve
The recieve page allows you to create a personalized wallet QR code to give other users. The QR code is automatically generated for your vanilla address, however you can customize it if prefered by entering the optional information and clicking ‘Update’.
Export
At the export page, you can view your public address, download a pdf backup, or export your raw credentials (private keys, mnemonic seed, or exporting to a file).
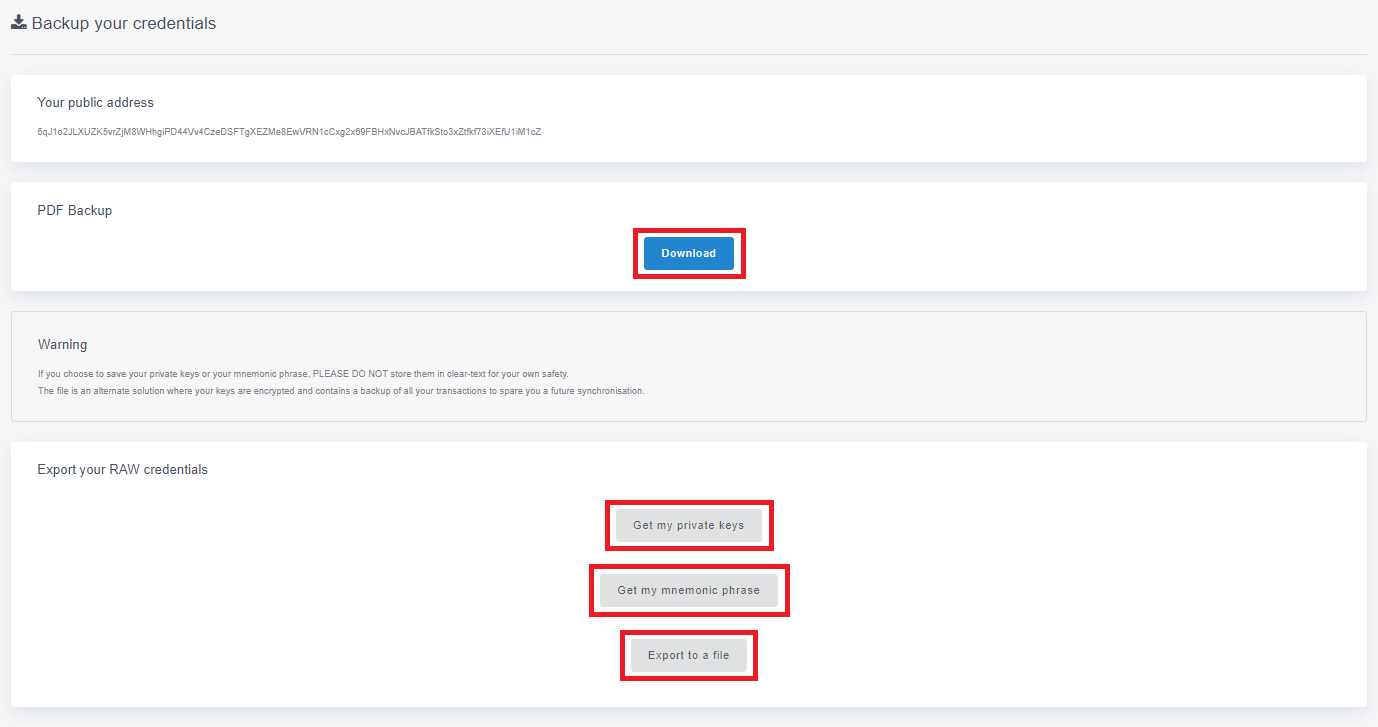
Exporting to a file will also contain a backup of all wallet transactions, which will speed up future syncronizations if you ever need to import the wallet.
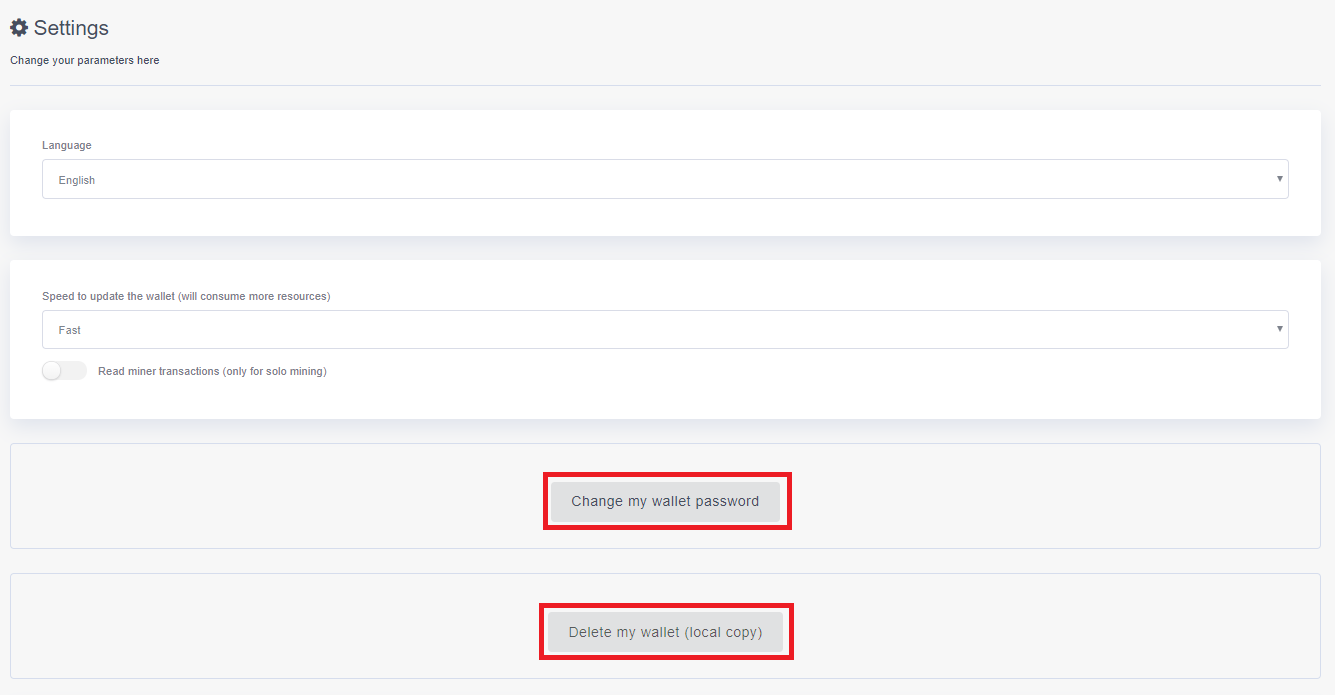
Settings
The settings page allows you to change the wallet language, change the sync speed (faster speed will consume more hardware resources), change the wallet password, or delete the local copy of the wallet.
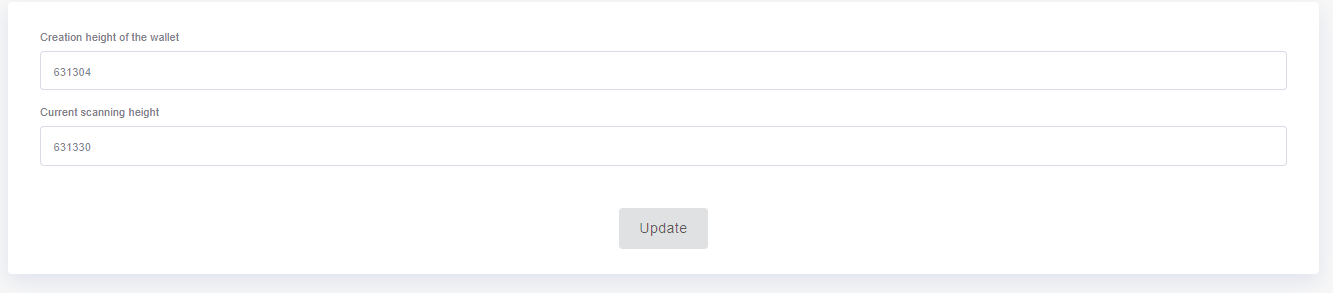
The restore height can also be changed by entering the desired height and clicking ‘Update’.
Donate
The donate page lists the web wallets developer (gnock) donation addresses, as well as the Masari project’s development donation addresses. Consider sending some spare Masari for the hard work completed!
Disconnect
Clicking this will disconnect and close the wallet, then return you to the landing page.
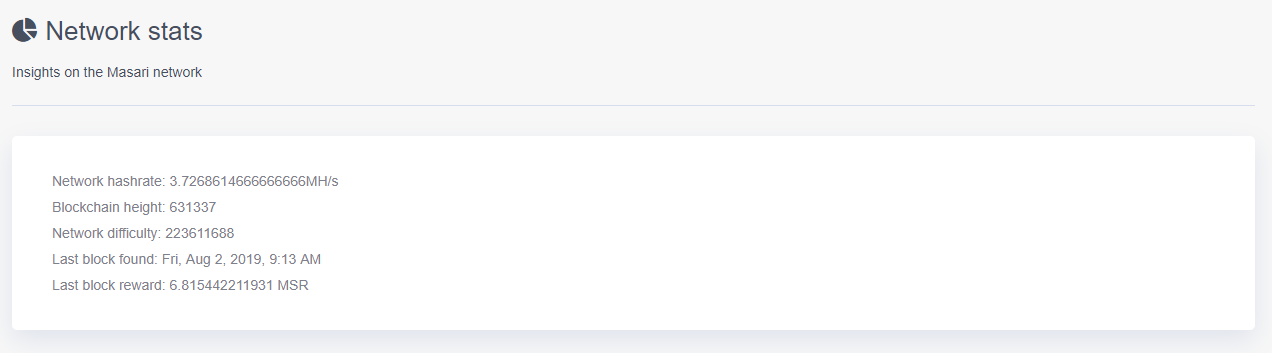
Network Stats
The network page lists several stats about the Masari network.
This concludes the Masari wallet activity. Enjoy having Masari readily available via the web! If you have any questions, hop on any Masari community and ask for help.
This educational activity is designed to show the new user how to securely store Masari in cold storage (also known as a paper wallet).
Cold storage refers to a wallet which resides offline, disconnected from the Internet.
If you hold a large amount of Masari with no plans to spend anytime soon, cold storage can help you secure that value against attackers.
Creating a cold wallet can be completed in a variety of ways, each providing different security levels. In this guide we will focus on two:
For most users, option 1 will suffice and your Masari will be fairly secure. However, if you generate a wallet while your computer is infected, you risk losing your funds. Option 2 is a more secure option for a few reasons:
This, however, doesnt prevent any hardware based attacks such as Spectre and Meltdown, since you are using the same computer hardware on the hot OS. Additional precautions can be made such as buying a new computer which has never touched the Internet or using an old computer without Internet connection. You could then save the masari-wallet-generator utility on an Internet-connected computer to an USB drive and use it on the aforementioned computer. This method will not be covered.
It should go without saying, but it is up to you to determine threat model and use whatever option fits your needs.
You can download community made printable paper wallets to write down important information in style.

Skill Required
This option requires a moderate understanding of Masari and little computer knowledge.
Hardware and Software Required
1x Hot computer
Optional - 1x USB drive
1x Paper
1x Pen
1x Hash Utility. Most users utilize the built in Windows 10 utility or Ubuntu utility. An easy to use and well known GUI utility is QuickHash.
Downloading and Preparation
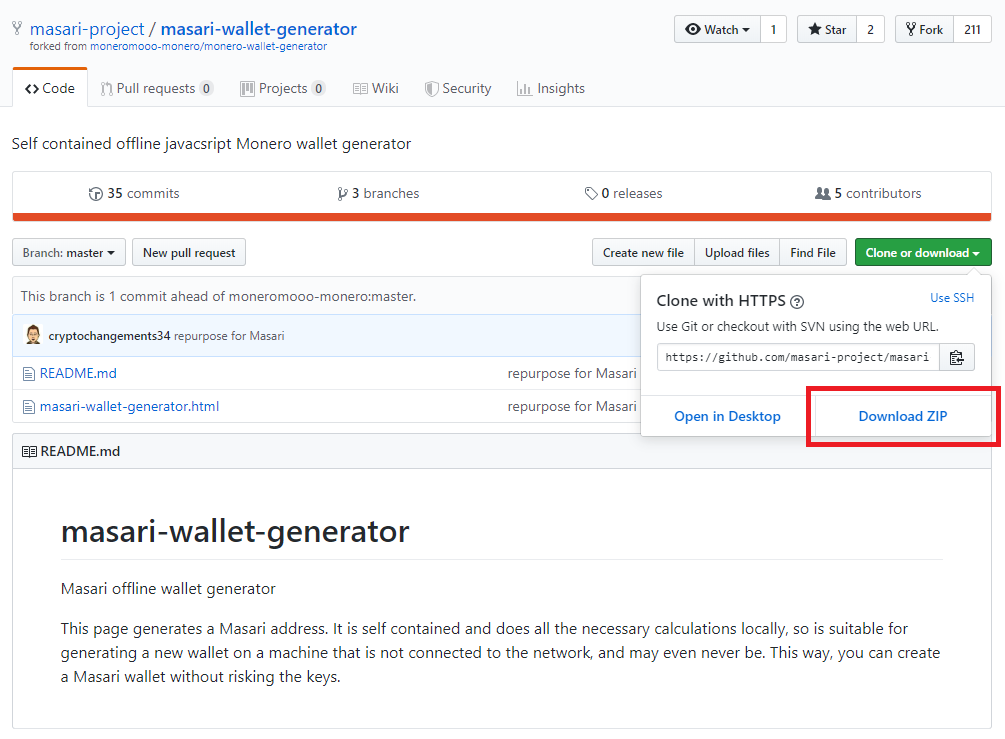
On your computer, navigate to https://github.com/masari-project/masari-wallet-generator and download the zip file by clicking the green box labeled “Clone or download” and then “Download ZIP”.
Unplug or disable internet access.
It is recommended to check that the sha256 hash of the downloaded zip file matches the following: 8897902B264D143EBC4705B9D787676C2425A68255397C359B6E2B8CCF78966A.
Generating a New Wallet
Unzip the file and open masari-wallet-generator.html.
Click “GENERATE WALLET”.

Mnemonic Seed and Address
After generating the wallet, four important items will be shown:


Somewhere by your choosing, write down your public address and mnemonic seed. Make sure to keep a copy (or multiple copies) at all times in a secure place, as your wallet cannot be recovered if you lose your mnemonic seed. Also, never share this information with anyone except trusted parties.
Optionally, you can copy/paste (do not type) your public address and private view key to a text file and save on a separate USB stick. This can be used to more easily create a view only wallet later with relative abandon. The only consequence being, if someone gets a hold of your address and private view key, they could view the funds in your wallet. They would not be able to, however, spend any funds.
Clean Up
Delete any copy of the wallet generator left over on the device you used.
Restart your computer.
Reconnect to the internet.
Congratulations! You have sucessfully generated a paper wallet.
Skill Required
This option requires a moderate understanding of Linux, Masari, network security, and general computer knowledge.
Hardware/Software Required
1x Hot Computer
2x USB Stick
1x Paper
1x Pen
1x Hash Utility. Most users utilize the built in Windows 10 utility or Ubuntu utility. An easy to use and well known GUI utility is QuickHash.
Creating the Bootable USB
You can either download a community made pre-zipped file that has all the tools you need using this guide, or follow the instructions below to download the required programs yourself.
On your computer, navigate to https://github.com/masari-project/masari-wallet-generator and download the zip file by clicking the green box labeled “Clone or download” and then “Download ZIP”.
It is recommended to check that the sha256 hash of the downloaded zip file matches the following: 8897902B264D143EBC4705B9D787676C2425A68255397C359B6E2B8CCF78966A.
Download your prefered program to format and create bootable USB flash drives. A popular and open source program is Rufus. Checking the sha256 hash is recommended.
Download your prefered Linux iso (Linux Mint is recommended for people who are used to Windows). Checking the sha256 hash is recommended.
Format your USB stick (if the USB is not new) and create a bootable USB drive with the Linux iso.
Copy the still zipped wallet generator file onto the newly created USB drive.
Unplug or disable internet access, and shut down the computer.
Generating a New Wallet
Boot into the Linux distro and navigate to the wallet generator zip file location. Paranoid users can double check that the sha256 hash is still the same by opening a terminal, navigating to the location of the zip file and typing sha256sum masari-wallet-generator-master.zip
Unzip the file and open masari-wallet-generator.html.
Click “GENERATE WALLET”.
Mnemonic Seed and Address
After generating the wallet, four important items will be shown:
Somewhere by your choosing, write down your public address and mnemonic seed. Make sure to keep a copy (or multiple copies) at all times in a secure place, as your wallet cannot be recovered if you lose your mnemonic seed. Also, never share this information with anyone except trusted parties.
Optionally, you can copy/paste (do not type) your public address and private view key to a text file and save on a separate USB stick. This can be used to more easily create a view only wallet later with relative abandon. The only consequence being, if someone gets a hold of your address and private view key, they could view the funds in your wallet. They would not be able to, however, spend any funds.
Clean Up
Delete any copy of the wallet generator left over on the usb.
Unplug the bootable usb and restart your computer back into your normal OS.
Reconnect to the internet.
Format the bootable usb, or even better smash it to smithereens using a hammer.
Congratulations! You have sucessfully generated a paper wallet.
This concludes the Masari wallet activity. Enjoy hodling your Masari in a paper wallet! If you have any questions, hop on any Masari community and ask for help.
This educational activity is designed to show the new user how to use the Graphical User Interface (GUI) Wallet.
Downloading
To start, you will need to download the official Masari wallet from getmasari.org. You may pick from any operating system but be sure to select the GUI wallet and not the CLI wallet.
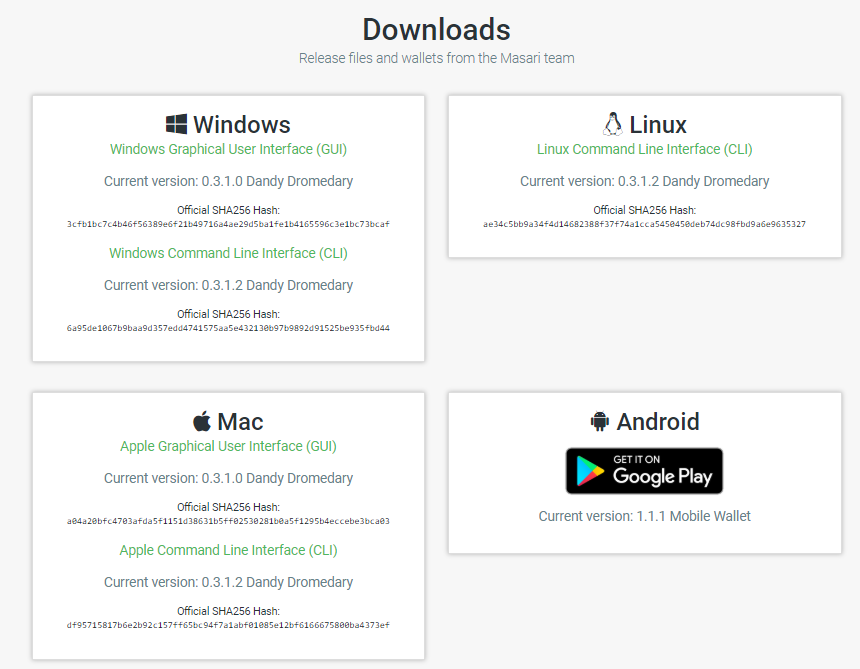
Checking the sha256 hash (correct hash is listed) is recommended.
Open the Masari Wallet
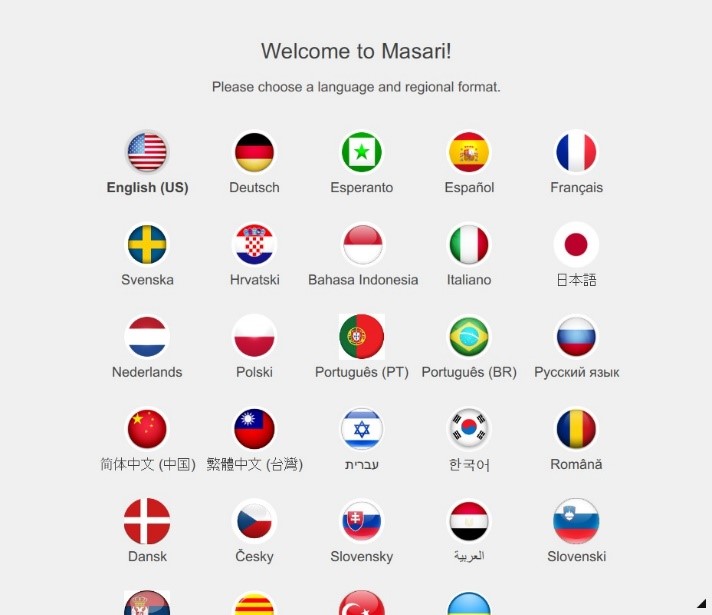
Once you have downloaded the Masari GUI wallet, unzip the file and double click masari-wallet-gui to open. The GUI will prompt you to select a language. To select a language, simply double click your country’s flag.
Setting Up Your Wallet
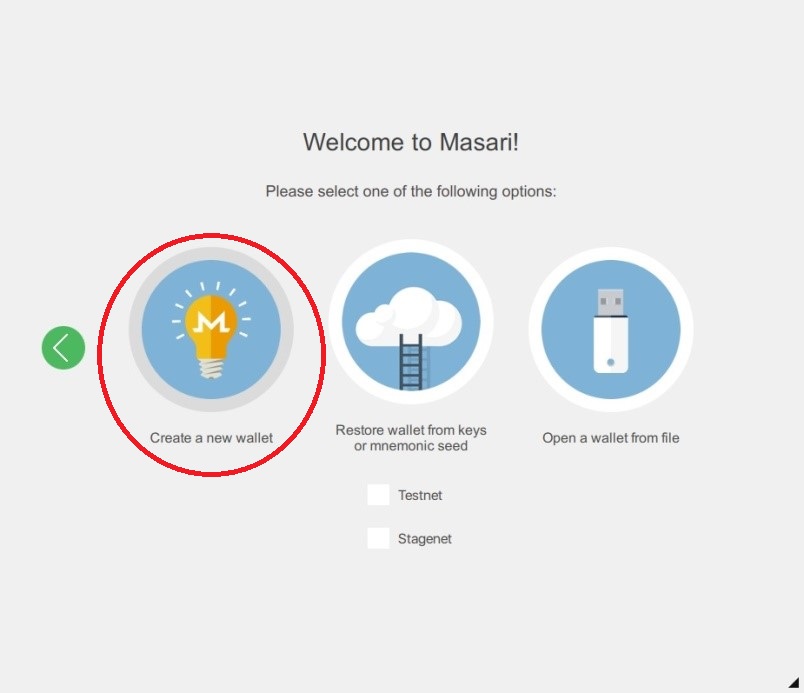
Once you have picked your language, you can create a new wallet by clicking ‘Create a new wallet’.
When you click this icon, you will be given a mnemonic seed. This list of words is what is used to restore your wallet if you ever lose it or forget the password. Make sure to keep a copy (or multiple copies) at all times in a secure place, as your wallet cannot be recovered if you lose it. Also, never share this information with anyone except trusted parties.
Choosing a Password
After writing down your mnemonic seed, you will be prompted to choose a password for your wallet.
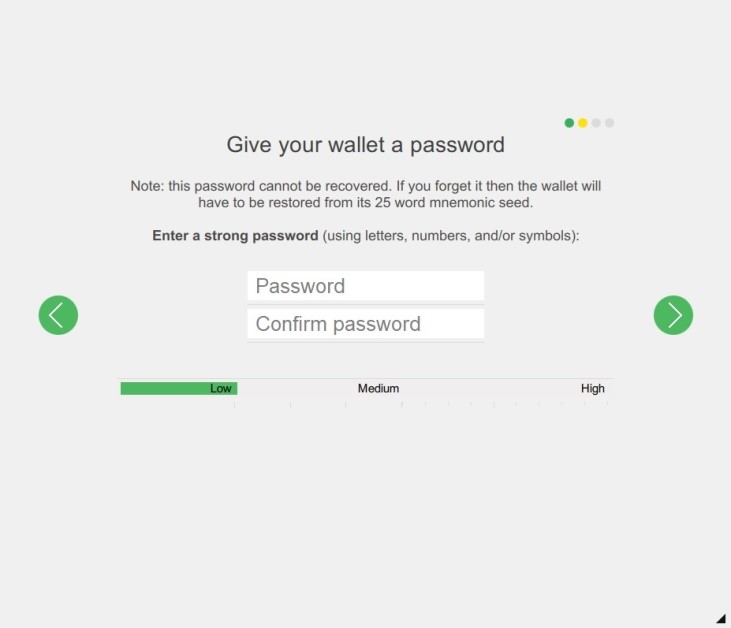
It is advisable to pick a password that is complex, as you could lose your funds if a malevolent person logs into your wallet.
Daemon Settings
When you have chosen your password, the wallet will then ask you what kind of Daemon settings you wish to have. The easiest way for your wallet to connect to the blockchain is by selecting the default status of ‘start a node automatically in the background’.
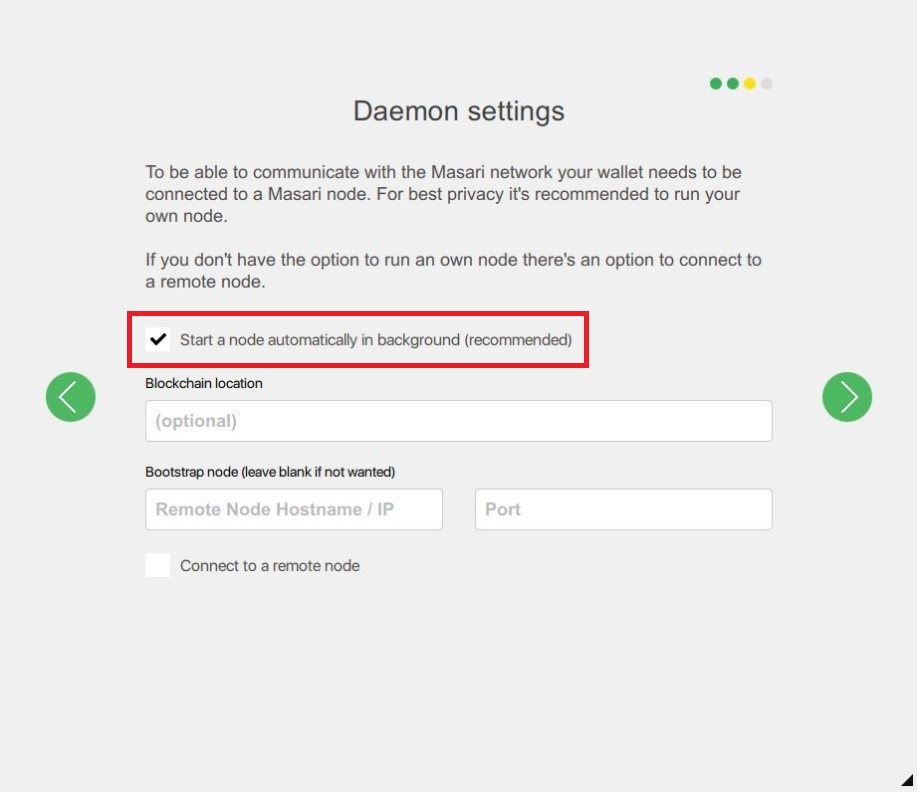
It may take a while for you to synchronize with the network with this selection and your computer may slow. This is normal and you have no need to worry. Faster computers will generally not slow down as much.
Congratulations! You have created a Masari wallet using the GUI!
The GUI wallet is designed to give you the simplest PC experience using Masari. This being the case, sending and receiving Masari is a snap!
Synchronizing
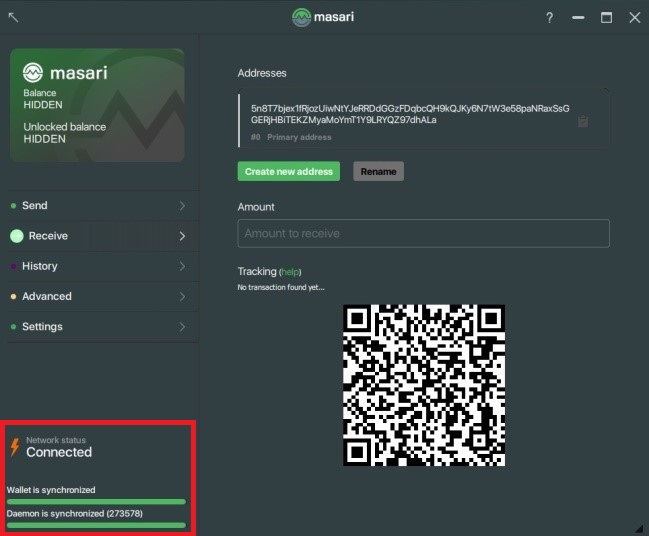
The first thing you must do when using your wallet is wait for the daemon to synchronize to the network. The wallet will begin syncing automatically after opening the wallet (assuming you chose start a node in the background). You can see progress in the bottom left of the wallet. When you are synchronized, the daemon will inform you that you may now use Masari.
Sending
To send funds, click the ‘Send’ tab on the left sidebar, then enter the amount of Masari you wish to send in the ‘Amount’ field and the address in the ‘Address’ field.
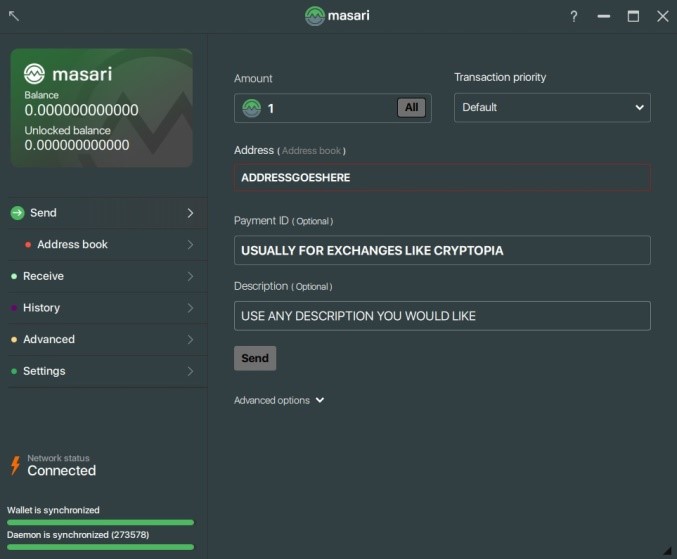
In some cases you may be required to enter in a payment ID to send your funds successfully. This feature is mostly relegated to some exchanges.
For most transactions, keep the ‘Transaction Priority’ as the default.
Receiving Funds
To receive funds, click on the ‘Receive’ tab on the left sidebar. When you do this, you will see an address that starts with a 5.

You can click the clipboard on the right of the address to automatically copy the address to your computer’s clipboard. Alternatively, the QR code on this screen is a visual representation of your address, copy it to signs and cards to receive funds in your physical store.
Looking at Your History
If you want to see your transaction history, all you need to do is click on the ‘History’ tab on the sidebar. From there, you will be able to see a history of all of your purchases and notes.
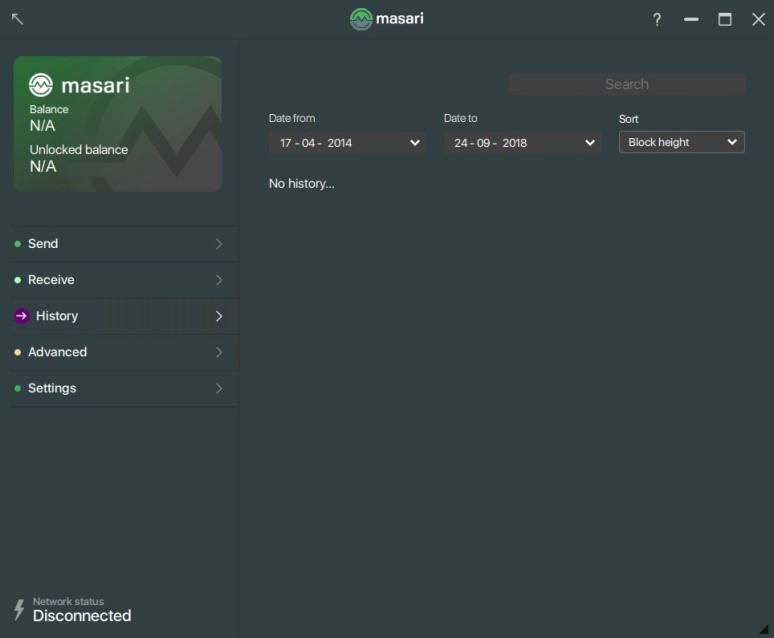
Here you will also be able to see any notes you have added to each transaction.
Checking Your Seed
You can view your mnemonic seed again by clicking the ‘Settings’ tab and selecting ‘Seed & Keys’. When you do this, you will be prompted to type your password again. From there, you will be able to see your mnemonic seed as well as your secret keys.
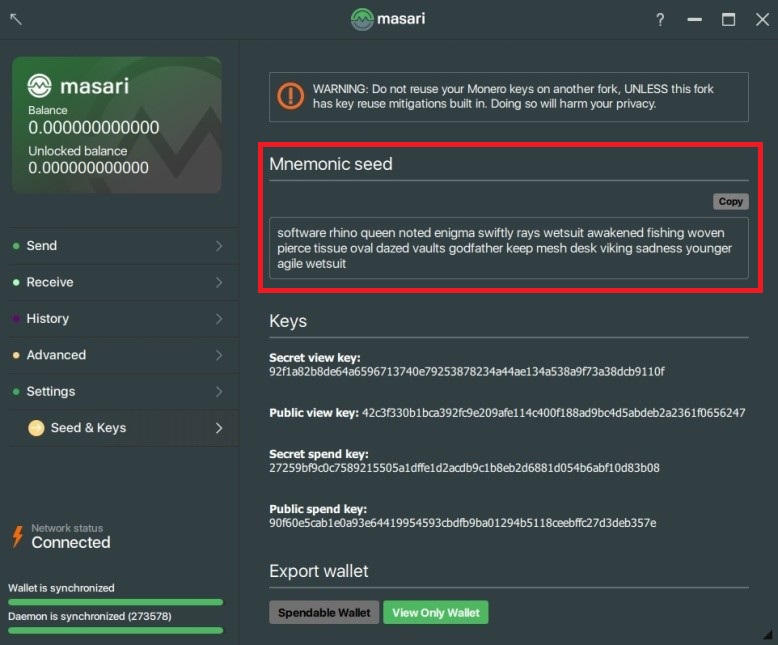
Again, do not share this information with anybody except with trusted parties.
You may also export a view only wallet at the bottom of the page.
This concludes the Masari wallet activity. Enjoy having Masari readily available on your desktop! If you have any questions, hop on any Masari community and ask for help.
Top